HOW TO POSTS: LIGHTING AND COMPOSITION
raw vs jpg - what's The Difference And Which is sharper
WRITTEN BY: BRUCE LOVELACE
UPDATED: JANUARY 5, 2024
You're wondering whether to shoot raw or jpg, which format is sharper, and which is better. This question has been around for a long time. Some photographers (like me) prefer to shoot everything RAW and adjust the sharpness, color balance, and other adjustments of their photos selectively as needed afterwards. Let's find out what's best for you.
The biggest benefit of shooting in RAW format is the ability to edit non-destructively. You can make adjustments to the original RAW file in many different ways and those edits are not permanent changes to the file.
Think of them as simply a set of changeable instructions on how to show the image in different ways.
Most casual photographers shoot everything as jpgs and don't want to be bothered with editing photos afterwards. A small percentage of photographers shoot both RAW and JPG at the same time.
This post will explain these 3 options and how they affect sharpness. After reading this you'll be able to choose the best option based on your shooting style.
JPG photos are slightly sharper than RAW if you keep your camera sharpness settings on "standard" or "auto." You can make your JPG photos even sharper by adjusting the settings in your camera's menu. Raw photos are less sharp coming out of the camera, but can be made sharper than JPGs with editing software afterwards.
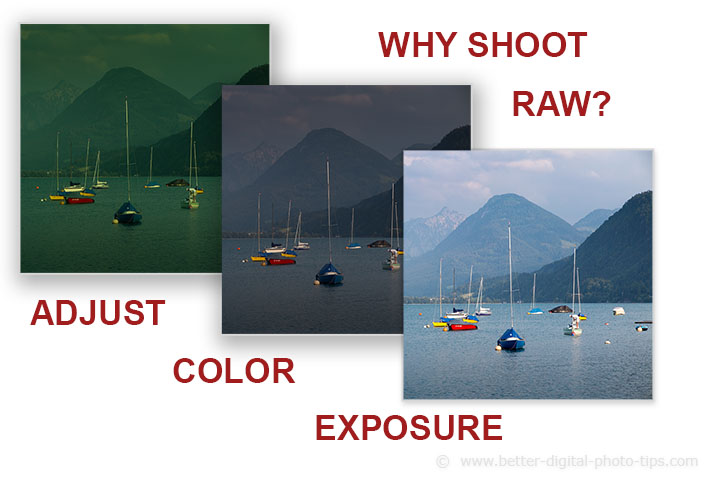 In addition to being able to adjust sharpness,
these are the two big reasons to shoot using raw mode: adjusting color and changing the exposure.
That's the simple and accurate answer, but which is better for your image sharpness, jpg or raw? There's more to the answer than just controlling sharpness. I'm going to tell you a story that will help you figure it out. It's worthwhile to read and it will help you decide whether you should shoot raw or jpg.
I once attended a photography boot camp on macro photography and I was shocked to find out that the instructor never shoots in raw mode and only shoots jpg images. After all, he's a full-time, shooting pro. Shouldn't all pro photographers shoot raw for the ultimate in quality? No! His reasoning was simple and it made sense to me when he explained it.
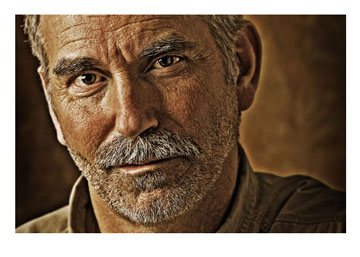
Mike Moats, Macro Man From Michigan, entered the digital photography world in 2001, a time when memory cards were limited in size and were also very expensive. Being self-taught and not formally educated in photography, his opinion was not tainted by learning the personal biases of professional photographers. He learned on his own.
Mike Moat's preference for shooting JPG was purely economical, for saving money and memory space.
Mike was just shooting as a hobby when he started. He wasn't obsessed with ultimate image quality, post processing creativity, and making money with his photos. He just wanted to have fun with shooting digital photos. He wanted to keep it simple.
Take the photos. Download from the camera. Print or share. That sounds easy, right?
Raw files are really big. Memory cards had very limited capacity back then. Mike would have needed to purchase several pricey memory cards just to accomplish an average photo shoot. He decided to take the economical route. JPG photo files are much smaller and don't fill up memory cards as fast.
why raw vs jpg argument could made sense for you
Mike Moats shot in jpg mode because the digital image files were smaller and easier to edit afterwards. Those files were much simpler to process. His reasons why he shot JPG when he first started.
- Too expensive for a hobbyist to shoot raw and buy several memory cards
- Raw files filled up computer's hard drive and took a long time to process with software.
It was too expensive and too time consuming back then. But, what about now? Is this important to you? Now, memory cards are dirt cheap and have huge capacities for thousands of images. Computers are fast and powerful. Should you consider switching and shoot raw?
Big Benefit of shooting RAW
Another one of the biggest benefit of shooting in RAW format is the ability to correct for bad exposure. You can make much larger adjustments to the original RAW file than you can with a JPG file.
This is particularly helpful when you have over-exposed highlights. You can save an over-exposed RAW image, but you can;t save an over-exposed JPG image.
your 3 options for RAW and JPG
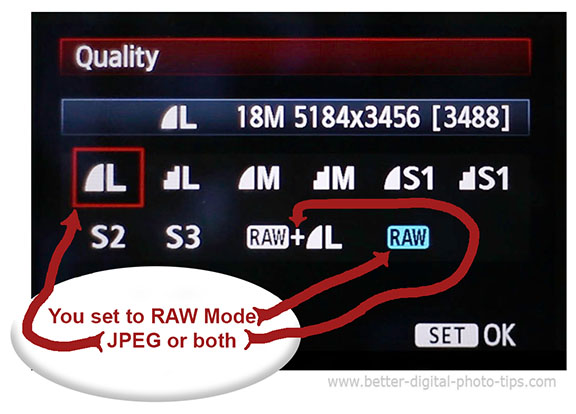
Okay, let's dive into the 3 options you have when choosing what quality setting you're going to set your camera on. Your options are shooting everything as a jpg, shoot everything in RAW, and shoot both jpg and RAW.
1. why you should everything as jpg
Cameras do a pretty good job of sharpening your photo right in the camera with your camera set for sharpness levels pre-set when your camera was first whipped to you. Automatic color balance is usually good too and you can adjust that in your camera too.
Stay with me here and let's jump back to Mike for a second.
Mike shoots almost exclusively macro photography under lighting conditions he finds or helps create. He understands exposure, knows lighting and is not concerned about making a mistake with exposure. Also Mike feels perfect color balance is not vital in the arena of macro photography.
I agree that the color balances don't have to be perfectly accurate with macro photography. He just want them to be pretty images. He creates breath-taking images by shooting jpg images and using creative software applications afterwards. Mike gets great results. He has developed his craft using jpeg images from the beginning and doesn't need to delve into a new shooting mode. He likes to keep it simple. I get it.
2. why you should shoot everything raw
Here are 3 important reasons you should shoot everything in RAW mode.
- You can adjust the sharpness much more precisely after you view it on your computer monitor and judge how much more sharpness your image needs.
- Big adjustments in exposure are easy to do when editing a raw file. Raw image files capture a higher dynamic range of brightnesses. You can correct for severely over and underexposed photos, and adjust contrast better.
- Big adjustments in color balance are easy to do when editing a RAW file. AND, you can try different corrective and creative adjustments to the original RAW file as many different ways as you wish.
With portrait photography, it's critical that your subjects eyes are perfectly sharp. Shooting RAW will enable you to sharpen the eyes without oversharpening other areas of the photo. Here's a side-by-side comparison of photos shot in RAW mode and saved with and without sharpening.
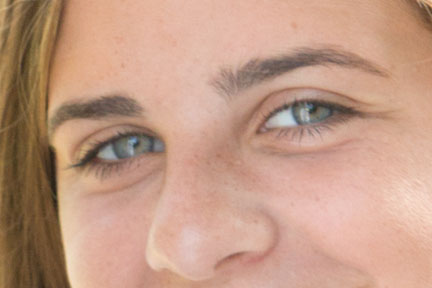 Unsharpened jpg portrait
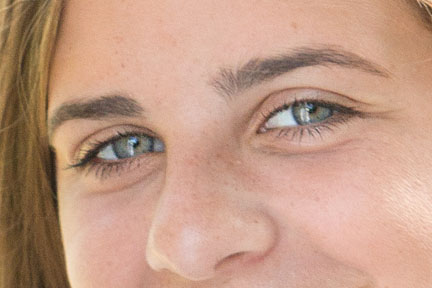 Sharpened jpg portrait
You also really want to color balance to make subjects look good with pleasing skin tones. You need the fine control of color temperature that RAW files give you.
Think of your camera's RAW setting as a almost free insurance policy. That's right. It's insurance you can use just in case your camera's automatic color balance or auto-exposure fails to give you the results you want.
As I mentioned earlier, the best part of shooting RAW is that you can go back to the original RAW file anytime you want and process in as many different, unique and creative ways as you want. That's exciting because it gives an infinite number of options to creative an interesting photograph!
3. Why you should shoot both
If you shoot both RAW and jpg photos, you have the ability to use the jpg right away, straight out of the camera. After you're done your photo shoot examine your jpg photos. If you're completely happy with them, then delete the RAW files if you want. No harm. No foul.
You get the best of both worlds. You get the jpg to save, share, or print right away and you get the choice of using the RAW file later to get creative or correct a shortcoming in exposure or color balance. Having enough camera memory to handle the bigger RAW files just isn't an issue anymore. Memory cards are so big and so cheap, it's just not an issue. Period.
raw vs jpg color corrections
I'm a lighting geek too and interesting lighting situations will come to you if you look for them. That's what my brain seems to focus on. I want to be able to experiment with different color balances to get different results from the same original image.
Below is a photograph of my bathroom window. Now, don't laugh at me-remember I'm a camera geek! I noticed the significant difference in color temperature between the inside and the outside lighting. The incandescent light from inside the bathroom was quite yellowish. The outside light was quite bluish.
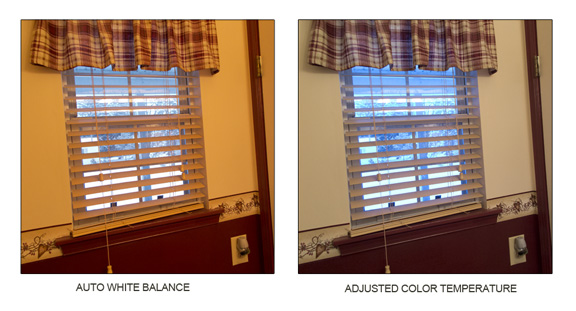 Raw mode gives you ability to choose a desirable color balance afterwards.
I saw it as an opportunity to share some insight with the readers of Better Digital Photo Tips. I quickly grabbed my Canon G1X Mark II. It's my go to point-N-shoot camera when I want a quickie. I snapped the photo without checking my white balance setting. The auto white balance didn't handle the situation very well at all.
Although some adjustments can be made to color balance on a jpg file, you have a lot more ability to make major adjustments in color balance with a raw file. Raw image files also can be adjusted for extreme exposure mistakes. If you shoot raw, you can overcome significantly over and underexposed photos. You can make adjustments afterwards. It's like having insurance in the event that you or your camera made a mistake.
Here's another photograph that shows why I shoot raw not jpg. Look at how big of an exposure adjustment was done below. The raw image on the left was underexposed by 3 f/stops, or about 1/8th the correct amount of exposure.

The image on the right was adjusted by 3 f-stops. It was an easy correction to make on the raw file. This extreme of a case of underexposure would be practically impossible to correct if you had started with a JPG.
SUMMARY OF RAW VS JPG
RAW
- Total control and selective sharpening afterwards.
- No permanent changes to the original file
- Bigger files.
- More memory storage required.
- Longer time to process or edit.
- More possibilities for creative editing.
JPG
- Adjustable in-camera sharpness setting.
- Smaller files.
- More photos fit on memory card.
- Faster processing.
- No raw conversion software necessary.
You have to evaluate your own photography desires to pick a mode, raw vs jpg. Sometimes I shoot both, which takes up even more memory, but I like the idea of having the raw image data to go back to if I want to experiment and process it differently a few times. The simple explanations of raw and jpg are below.
explanation of raw format
Also called camera raw or raw format. Raw gives you all the uncompressed data. Shooting in "raw" mode allows the photographer to process the data later instead of having the camera process the data at the time the picture is taken. It contains all of the information possible from a camera's sensor.
Saving the raw image allows us to process it in any manner we wish later, making choices on color, sharpness, exposure and many other variable. Raw files are very large compared to the standard jpg format that all digital camera can shoot in.
explanation of jpg (jpeg)
The abbreviation is actual jpeg, which stands for Joint Photographics Expert Group. So you sometimes see this ageless question asked as "raw vs jpeg." It's just simpler to call it RAW vs jpg because jpg is the extension that's used when you save your photo. We commonly write it as jpg and they are the letters used as the file extension: "yourphotonumber.jpg"
The JPEG committee created the standard, which compresses the data, making it a much smaller file. Why? Because this much smaller file is easier to edit and save, without getting a significant loss in quality. Hopefully, these two opposing viewpoints will help you choose which way to go in the raw vs jpeg choice.
I hope found this article helpful, For related topics look at the articles listed below my signature. For searching specific topics, use the search box below.
Search for a new topic on this site:


ABOUT BRUCE LOVELACE
Bruce is the publisher of this website. He is the author of the book "Improve Your Photography Instantly." Read more on Bruce on his Bio Page. He's been known as The Traveling Photographer ever since 1994. Read more about this website.
View some of Bruce's photos on Instagram. Visit the Facebook Page. Watch him on YouTube. Bruce runs photo workshops for kids and adults, and provides one-on-one photography coaching.
Digital Photography Education Location on Google My Business
